How to Identify and Observe Meteorite Features at Home
Discover how to identify authentic meteorites and explore their hidden microscopic features using simple tools. This guide reveals the secrets locked in these cosmic visitors.
Your Cosmic Catch: How to Identify and Observe Meteorite Features at Home
Learn more about macbook pro major upgrade: oled display coming 2026-2027
Holding a meteorite means touching a piece of space history that traveled millions of miles before landing in your hands. These extraterrestrial rocks contain secrets about our solar system's formation, yet many people struggle to identify genuine meteorites or observe their fascinating microscopic features. Understanding how to properly examine these cosmic visitors transforms a simple rock into a window to the stars.
This guide walks you through identifying and observing meteorite features using tools you likely already own. You will learn to distinguish real meteorites from terrestrial rocks and discover the hidden structures that make each specimen unique.
How Do You Identify a Real Meteorite?
Before examining your specimen under magnification, you need to confirm whether your rock came from space. Genuine meteorites display several distinctive characteristics that set them apart from Earth rocks.
Most meteorites feel unusually heavy for their size due to high iron content. A meteorite the size of a golf ball often weighs two to three times more than a similar-sized terrestrial rock. This density difference provides your first clue during field identification.
The fusion crust offers another telltale sign. This thin, dark coating forms when the meteorite's surface melts during atmospheric entry, creating a glassy black or dark brown shell. Fresh falls show prominent fusion crusts, while older specimens may have weathered surfaces that obscure this feature.
What Does a Meteorite's Surface Tell You?
Examine your specimen's exterior for regmaglypts, the thumbprint-like depressions covering many meteorites. These shallow indentations form as softer materials ablate during the fiery descent through Earth's atmosphere. Running your fingers across the surface reveals these subtle features better than visual inspection alone.
Magnetic properties provide a quick test for iron content. Most meteorites contain enough metal to attract a strong magnet, though this test alone cannot confirm authenticity since some Earth rocks also contain magnetic minerals. Use magnetism as one piece of evidence rather than definitive proof.
How Should You Prepare Your Meteorite for Observation?
Proper preparation ensures you observe the most interesting meteorite features without damaging your specimen. The preparation process varies depending on whether you examine the exterior or create a polished section for internal viewing.
Cleaning Your Specimen
For a deep dive on apple smart home display: fall launch with ios 27, see our full guide
Start with gentle dry brushing using a soft-bristled brush to remove loose dirt and debris. Avoid harsh chemicals or abrasive cleaners that might damage the fusion crust or alter surface features. For stubborn dirt, use distilled water sparingly and pat dry immediately to prevent rust formation on iron-rich specimens.
Some collectors create a small window by carefully grinding and polishing one surface. This process requires:
For a deep dive on what's working in march 2026: tech trends shaping now, see our full guide
- Silicon carbide sandpaper (progressively finer grits from 220 to 2000)
- Diamond polishing paste or aluminum oxide powder
- A flat glass plate for grinding
- Water for lubrication during grinding
- Patience and steady pressure
Work through each grit level systematically. Ensure the previous scratches disappear before moving to finer grades. The final polish reveals internal structures invisible on rough surfaces.
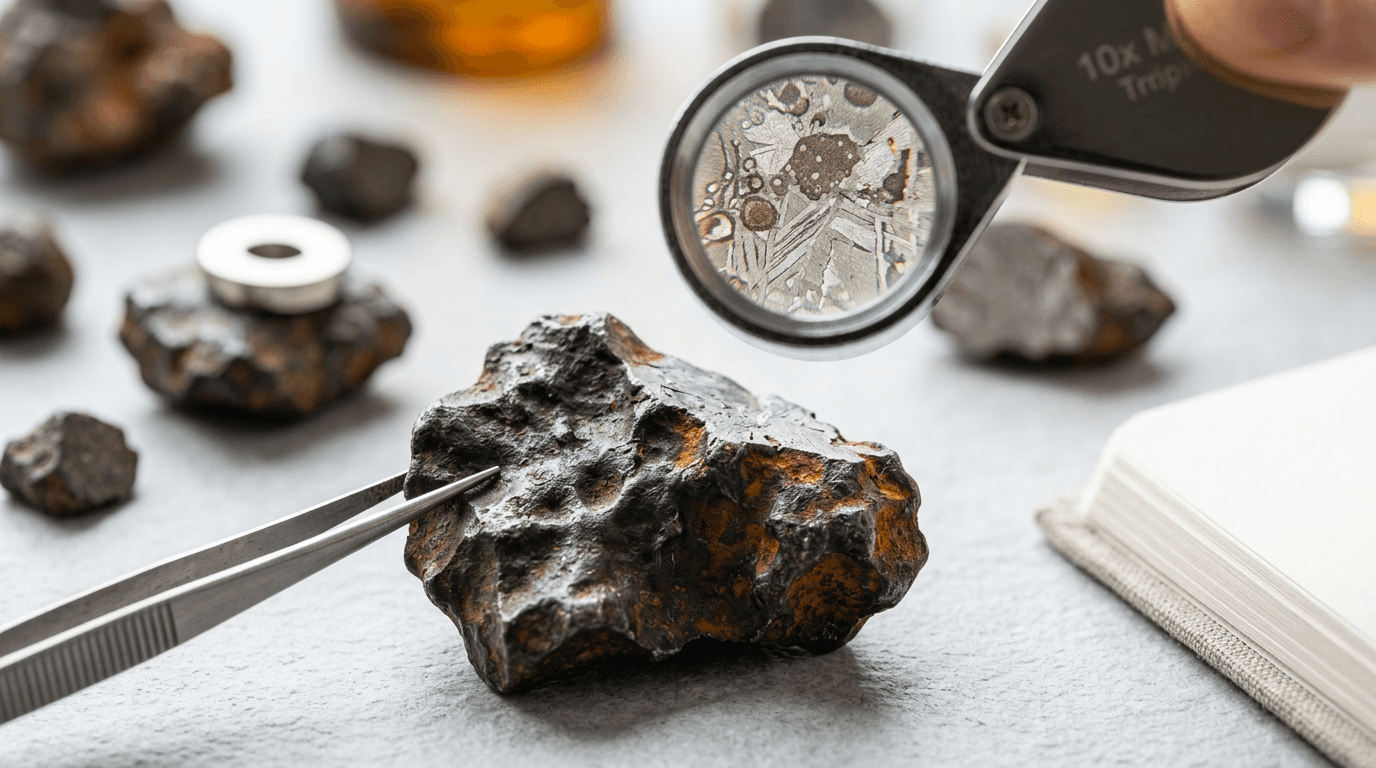
What Microscope Setup Works Best for Meteorites?
A basic stereomicroscope with 10x to 40x magnification reveals most meteorite features adequately. Higher magnification helps identify specific mineral structures, but lower powers provide better overall context for your observations.
Position your light source at oblique angles rather than directly above the specimen. Side lighting enhances surface texture and makes regmaglypts, fusion crust details, and crystal boundaries more visible. Experiment with different angles to highlight various features.
How Do You Optimize Magnification Levels?
Begin observations at the lowest magnification to survey the entire specimen and identify areas of interest. This overview helps you locate chondrules, metal flakes, or unusual mineral inclusions worth examining at higher power.
Increase magnification gradually as you focus on specific features. Most chondrules appear clearly at 20x to 30x magnification, while individual mineral grains require 40x or higher. Document your findings with smartphone photography through the eyepiece for future reference.
What Key Features Should You Look for Under the Microscope?
Different meteorite types display characteristic structures that help classify your specimen. Understanding these features transforms random observations into meaningful scientific examination.
Chondrules: The Building Blocks
These spherical structures represent some of the oldest solid materials in our solar system. Chondrules appear as rounded grains ranging from microscopic specks to several millimeters across. They formed as molten droplets in the early solar nebula before incorporating into larger bodies.
Under magnification, chondrules show various internal textures. Barred olivine chondrules display parallel crystal bars. Radial pyroxene chondrules exhibit crystals radiating from a central point. These textures reveal the cooling rates and conditions present 4.6 billion years ago.
Metal and Mineral Distribution
Bright, reflective flakes scattered throughout the matrix indicate metallic iron-nickel alloy. These metal grains catch light differently than surrounding silicate minerals, creating a distinctive sparkle under the microscope. The distribution pattern helps distinguish between different meteorite classifications.
Stony-iron meteorites show dramatic contrasts between translucent olivine crystals and opaque metal. Pallasites, the most visually striking type, display gem-quality olivine embedded in nickel-iron matrix. Even small specimens reveal this characteristic texture under low magnification.
What Can Fusion Crust Details Reveal?
Microscopic examination of the fusion crust shows flow lines, gas bubbles, and compositional variations. These features record the meteorite's orientation during atmospheric entry and the intensity of heating it experienced. Fresh fusion crusts appear glossy with minimal cracking, while weathered examples show fracture networks and color changes.
Look for vesicles, tiny bubbles trapped in the melted surface layer. These voids formed as gases escaped during the brief melting event. Their size and distribution provide clues about entry velocity and atmospheric pressure at different descent stages.
What Advanced Techniques Reveal Hidden Details?
Once you master basic identification, several techniques enhance your observations and reveal additional details about your meteorite's composition and history.
How Do You Etch to Reveal Widmanstatten Patterns?
Iron meteorites display spectacular crystalline patterns when polished and etched with weak acid. The Widmanstatten pattern consists of interlocking kamacite and taenite crystals that formed during extremely slow cooling in asteroid cores. This structure cannot form on Earth, making it definitive proof of extraterrestrial origin.
Create an etchant using 2-5% nitric acid in ethanol (nital solution). Apply to a polished surface for 30-60 seconds, then rinse thoroughly with water and alcohol. The acid preferentially attacks kamacite crystals, revealing the geometric pattern under magnification. Always use proper safety equipment and ventilation when working with acids.
How Can You Photograph Your Observations?
Document your findings systematically to build a reference collection. Modern smartphones capture surprisingly detailed images through microscope eyepieces with practice and patience.
Stabilize your phone against the eyepiece using a dedicated adapter or improvised support. Disable flash and use the microscope's illumination exclusively. Focus manually if possible, and take multiple shots at different exposures to ensure optimal results.
How Should You Record and Interpret Your Findings?
Maintain detailed notes about each observation session. Record magnification levels, lighting conditions, and specific features observed. This documentation proves valuable when comparing specimens or researching classification details.
Sketch interesting features even if you photograph them. Drawing forces careful observation and often reveals details you might otherwise overlook. Label your sketches with measurements, magnification, and descriptive notes about colors and textures.
Building a Reference Collection
Compare your observations against documented meteorite types using reputable databases and scientific publications. The Meteoritical Society maintains comprehensive resources for amateur collectors. University geology departments often provide identification services for unusual specimens.
Create a systematic filing system for your documentation. Organize by specimen, date, or meteorite type depending on your collection size. Digital files should include raw images, processed photos, sketches, and written observations for each specimen.
What Safety Precautions Should You Take?
While meteorites pose minimal health risks, proper handling protects both you and your specimens. Wash hands after handling meteorites, especially those showing rust or weathering. Some specimens contain trace amounts of toxic elements, though exposure risks remain extremely low during casual observation.
Store meteorites in dry conditions to prevent rust formation on iron-rich specimens. Silica gel packets in storage containers maintain low humidity. Avoid airtight containers that trap moisture against the specimen surface.
When grinding or polishing, work in well-ventilated areas and wear appropriate dust protection. Meteorite dust contains metal particles and silicates that should not be inhaled. Wet grinding minimizes airborne particles while producing better surface finishes.
Start Your Journey into Cosmic Exploration
Observing meteorite features through a microscope connects you directly with our solar system's ancient history. Each chondrule, metal flake, and fusion crust detail tells part of a 4.6-billion-year story that began in the swirling disk around our infant sun. Your home laboratory becomes a portal to understanding planetary formation and the violent collisions that shaped our cosmic neighborhood.
Continue learning: Next, explore how yoghurt delivery women combat digital exclusion
Start with careful visual identification, progress to systematic microscopic observation, and document your findings thoroughly. These practices transform casual rock collecting into meaningful scientific exploration. The universe literally falls to Earth daily, and now you possess the knowledge to recognize and appreciate these cosmic messengers.
Related Articles

Strange Rocks: First True Evidence of Life on Mars?
NASA's Perseverance rover found rocks in Jezero Crater rich in organic molecules, hinting at possible life on Mars. Discover the implications of these findings.
Sep 21, 2025

Transforming Society: From 'Me' to 'We' Mindset
Discover how to transition from a 'me' to a 'we' society, fostering collaboration and community to tackle global challenges.
Sep 20, 2025

Ozempic, Wegovy, Mounjaro: How They Alter Taste Perception
Explore how Ozempic, Wegovy, and Mounjaro alter taste perception, making food taste sweeter or saltier, which may help curb cravings and enhance satisfaction.
Sep 17, 2025